
1. Checking the CVAT Environment Before Connecting a Model
Before deploying a model, check how CVAT is installed, which platform version is in use, and whether Docker Compose is available on the server.
In a self-hosted CVAT installation, automatic annotation models can run as separate serverless functions managed by Nuclio. CVAT sends an image to the function, receives object coordinates in return, and adds the resulting annotations to the task.
The interaction flow looks like this:
Annotator
↓
CVAT interface
↓
CVAT Server / Worker
↓
Nuclio
↓
Model container
↓
Model predictions
↓
Annotations in the CVAT task
Connecting to the server
Connect over SSH to the server where CVAT is running:
ssh <user>@<server-address>
For example:
ssh root@192.168.1.50
If CVAT was installed under a user other than root, switch after connecting to the user account that manages the Docker containers.
Finding the CVAT directory
If you know the CVAT path, go directly to it:
cd /opt/cvat
Replace /opt/cvat with the actual path to the repository.
You can check the current directory with:
pwd
The CVAT root directory should contain at least the following files and directories:
ls -la
Expected items:
docker-compose.yml
components/
serverless/
cvat/
If you do not know the installation path, try locating docker-compose.yml:
sudo find /opt /srv /home /root \
-maxdepth 4 \
-type f \
-name docker-compose.yml \
2>/dev/null
Then change to the directory you found:
cd <path-to-CVAT>
Checking the CVAT version
If CVAT was installed from a Git repository, record the current branch, tag, and commit:
git remote -v
git branch --show-current
git describe --tags --always --dirty
git rev-parse --short HEAD
You can also request information from the API of the running CVAT instance:
curl -ksS https://%your_domain%.com/api/server/about | python3 -m json.tool
The response should contain information about the CVAT server version.
If python3 is unavailable, run the request without formatting:
curl -ksS https:// ://%yor_domain%.com/api/server/about
Checking Docker and Docker Compose
Display the installed versions:
docker --version
docker compose version
Check the status of the CVAT containers:
docker compose ps
If the installation was started with a non-default Compose project name or the command does not show the containers, use:
docker ps \
--format 'table {{.Names}}\t{{.Image}}\t{{.Status}}\t{{.Ports}}' \
| grep -Ei 'NAME|cvat|traefik|nuclio'
The main CVAT containers should be in the Up or healthy state. Service names may differ by version, but the following are usually present:
cvat_server
cvat_ui
cvat_db
cvat_redis_inmem
cvat_redis_ondisk
cvat_worker_*
traefik
You can list the services defined in the main configuration with:
docker compose config --services | sort
Checking support for serverless functions
In current CVAT versions, the Nuclio configuration is stored in:
components/serverless/docker-compose.serverless.yml
Check that the file exists:
test -f components/serverless/docker-compose.serverless.yml \
&& echo "Serverless Compose file: OK" \
|| echo "Serverless Compose file: NOT FOUND"
Check that the model deployment scripts are present:
test -f serverless/deploy_cpu.sh \
&& echo "CPU deployment script: OK" \
|| echo "CPU deployment script: NOT FOUND"
test -f serverless/deploy_gpu.sh \
&& echo "GPU deployment script: OK" \
|| echo "GPU deployment script: NOT FOUND"
At this point, the Nuclio container may not be running yet. Check for it:
docker ps \
--format 'table {{.Names}}\t{{.Image}}\t{{.Status}}' \
| grep -Ei 'NAME|nuclio'
Also check whether the nuctl CLI is installed:
if command -v nuctl >/dev/null 2>&1; then
nuctl version
else
echo "nuctl is not installed yet"
fi
The nuctl version must match the Nuclio version specified in components/serverless/docker-compose.serverless.yml. The official CVAT documentation explicitly warns that a mismatch between the client and platform versions can cause function deployment errors.
You can view the Nuclio image in use with:
grep -nE 'image:.*nuclio|NUCLIO_VERSION' \
components/serverless/docker-compose.serverless.yml
Checking server resources
Display CPU information:
lscpu | grep -E \
'Model name|Socket|Core|Thread|CPU\(s\)'
Check the amount of RAM:
free -h
Check available disk space:
df -h /
docker system df
For the initial integration test, the model can run on CPU. A GPU is recommended for processing large image collections or running heavier neural networks.
Check for an NVIDIA GPU with:
nvidia-smi
If the command displays a table with the GPU name, driver version, and memory capacity, the server is ready for further GPU-container checks.
If you see the following error:
nvidia-smi: command not found
or:
No devices were found
the server has no accessible NVIDIA GPU, or the driver is not installed.
Saving diagnostic information to a file
To save the initial installation configuration, run the following diagnostic block from the CVAT root directory:
{
echo "===== DATE ====="
date -Is
echo
echo "===== HOST ====="
hostname
uname -a
echo
echo "===== CVAT DIRECTORY ====="
pwd
echo
echo "===== CVAT GIT ====="
git branch --show-current 2>/dev/null || true
git describe --tags --always --dirty 2>/dev/null || true
git rev-parse --short HEAD 2>/dev/null || true
echo
echo "===== DOCKER ====="
docker --version
docker compose version
echo
echo "===== CVAT CONTAINERS ====="
docker ps \
--format 'table {{.Names}}\t{{.Image}}\t{{.Status}}' \
| grep -Ei 'NAME|cvat|traefik|nuclio'
echo
echo "===== SERVERLESS FILES ====="
test -f components/serverless/docker-compose.serverless.yml \
&& echo "docker-compose.serverless.yml: OK" \
|| echo "docker-compose.serverless.yml: NOT FOUND"
test -f serverless/deploy_cpu.sh \
&& echo "deploy_cpu.sh: OK" \
|| echo "deploy_cpu.sh: NOT FOUND"
test -f serverless/deploy_gpu.sh \
&& echo "deploy_gpu.sh: OK" \
|| echo "deploy_gpu.sh: NOT FOUND"
echo
echo "===== NUCTL ====="
if command -v nuctl >/dev/null 2>&1; then
nuctl version
else
echo "nuctl: NOT INSTALLED"
fi
echo
echo "===== MEMORY ====="
free -h
echo
echo "===== DISK ====="
df -h /
echo
echo "===== GPU ====="
if command -v nvidia-smi >/dev/null 2>&1; then
nvidia-smi \
--query-gpu=name,driver_version,memory.total \
--format=csv,noheader
else
echo "NVIDIA GPU: NOT DETECTED"
fi
} | tee ~/cvat-preannotation-audit.txt
The result will be saved to:
~/cvat-preannotation-audit.txt
At this stage, we are only collecting information and are not changing the running CVAT configuration.
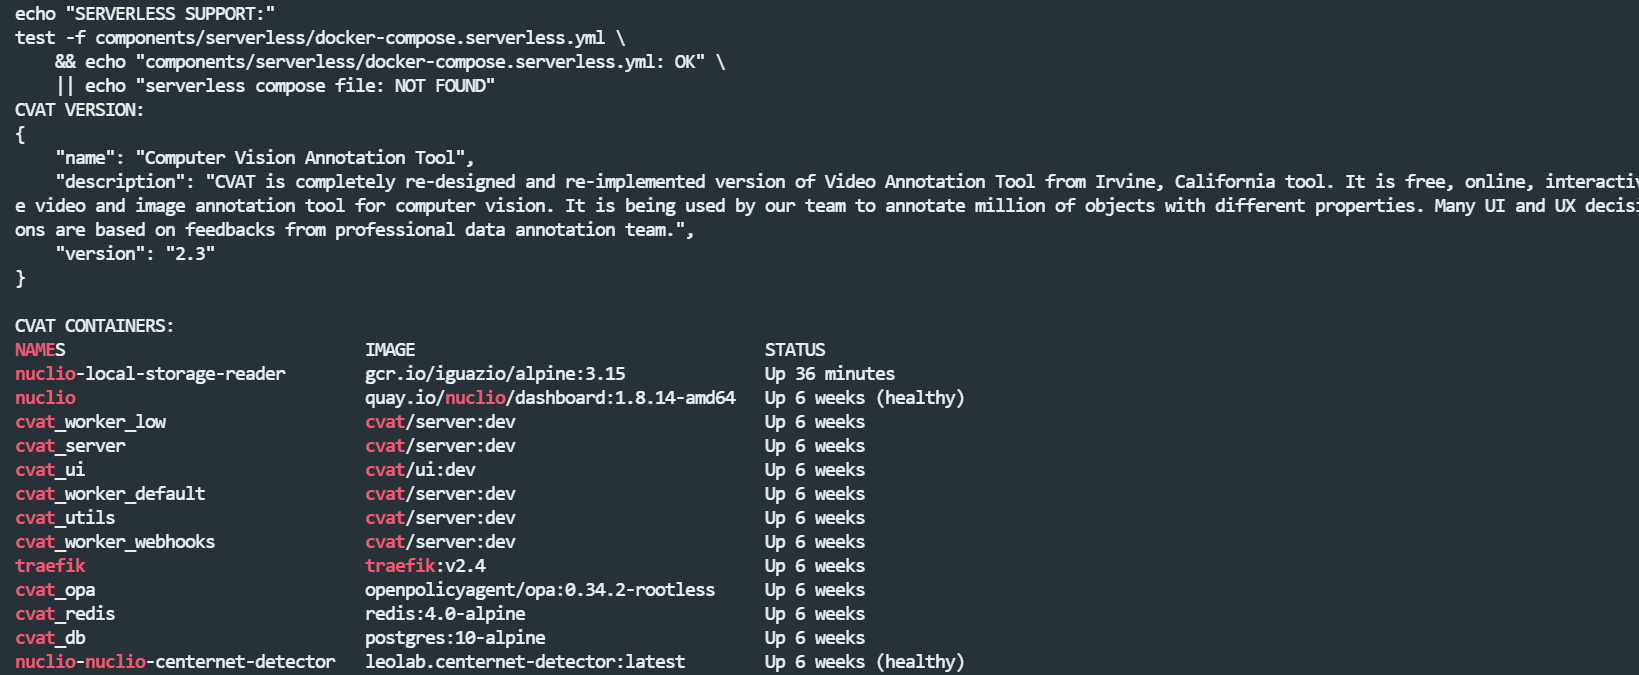
Checking the CVAT version, containers, and automatic annotation components on the CVAT server.
2. Installing and Connecting Nuclio to CVAT
Self-hosted CVAT uses Nuclio serverless functions to run automatic annotation models. Each model is deployed in a separate Docker container and becomes available to CVAT through the Nuclio HTTP interface.
The integration has three components:
- Nuclio Dashboard — the service used to manage functions.
- nuctl — a command-line utility for building, deploying, and deleting functions.
- Model containers — separate Docker containers that perform inference.
In current CVAT versions, the Nuclio infrastructure is started with the additional Compose file components/serverless/docker-compose.serverless.yml. The models themselves must be deployed separately after the serverless components are running.
2.1. Changing to the CVAT directory
Connect to the server over SSH and change to the directory from which CVAT is started:
ssh <user>@<server-address>
cd /opt/cvat
The /opt/cvat path is only an example. Use the following commands to verify that you selected the correct directory:
pwd
ls -la
It should contain the main file:
docker-compose.yml
2.2. Finding the serverless configuration
The file location depends on the CVAT version and repository structure. Newer versions use:
components/serverless/docker-compose.serverless.yml
In older or customized installations, the file may be located elsewhere.
Run an automatic search:
find . \
-maxdepth 4 \
-type f \
-name '*serverless*.yml' \
-o \
-name '*serverless*.yaml'
Save the discovered path in a variable for the following commands:
if [ -f components/serverless/docker-compose.serverless.yml ]; then
SERVERLESS_COMPOSE="components/serverless/docker-compose.serverless.yml"
elif [ -f docker-compose.serverless.yml ]; then
SERVERLESS_COMPOSE="docker-compose.serverless.yml"
elif [ -f serverless/docker-compose.serverless.yml ]; then
SERVERLESS_COMPOSE="serverless/docker-compose.serverless.yml"
else
echo "ERROR: serverless Compose file not found"
exit 1
fi
echo "Serverless Compose: $SERVERLESS_COMPOSE"
Expected result:
Serverless Compose: components/serverless/docker-compose.serverless.yml
The variable is valid only in the current SSH session. You will need to define it again after reconnecting.
2.3. Checking the configuration contents
List the services added by the serverless configuration:
docker compose \
-f docker-compose.yml \
-f "$SERVERLESS_COMPOSE" \
config --services
The list should include the Nuclio service, for example:
nuclio
Check which Nuclio image will be started:
docker compose \
-f docker-compose.yml \
-f "$SERVERLESS_COMPOSE" \
config \
| grep -E -A 3 -B 3 'nuclio/dashboard'
You will need the Nuclio version later to install a compatible nuctl version.
2.4. Starting CVAT with Nuclio
If CVAT uses only the main Compose file, run:
docker compose \
-f docker-compose.yml \
-f "$SERVERLESS_COMPOSE" \
up -d
This command does not reinstall CVAT. Docker Compose compares the current configuration with the new one, starts missing serverless services, and updates related containers if required.
This is the standard method described for enabling Nuclio in a self-hosted CVAT deployment.
If CVAT is running with an HTTPS configuration
If an additional HTTPS file is used, include it in the startup command:
docker compose \
-f docker-compose.yml \
-f docker-compose.https.yml \
-f "$SERVERLESS_COMPOSE" \
up -d
If other Compose files are used
The serverless command must include every Compose file used in the normal CVAT startup command.
For example, if CVAT is normally started with:
docker compose \
-f docker-compose.yml \
-f docker-compose.override.yml \
-f docker-compose.prod.yml \
up -d
then connect Nuclio with:
docker compose \
-f docker-compose.yml \
-f docker-compose.override.yml \
-f docker-compose.prod.yml \
-f "$SERVERLESS_COMPOSE" \
up -d
Add the serverless file last so that its settings extend the main configuration.
2.5. Checking the Nuclio container
Display the container status:
docker ps \
--format 'table {{.Names}}\t{{.Image}}\t{{.Status}}\t{{.Ports}}' \
| grep -Ei 'NAME|nuclio|cvat'
Expected result:
NAMES IMAGE STATUS
nuclio quay.io/nuclio/dashboard:<version>-amd64 Up ... (healthy)
cvat_server cvat/server:<version> Up ...
cvat_ui cvat/ui:<version> Up ...
The nuclio container should have the following state:
Up
or:
Up ... (healthy)
View the latest Nuclio messages with:
docker logs --tail 100 nuclio
Check whether the dashboard is reachable from the server:
curl -sS -o /dev/null \
-w 'HTTP status: %{http_code}\n' \
http://127.0.0.1:8070
Acceptable result:
HTTP status: 200
Some versions may return a redirect status:
HTTP status: 302
This also means that the Nuclio HTTP service is responding.
Do not expose the Nuclio Dashboard port directly to the internet. The dashboard should be accessible only to the server administrator or through an SSH tunnel.
2.6. Checking serverless activation in CVAT
The serverless configuration should pass the appropriate environment variable to the CVAT server.
Check it:
docker inspect cvat_server \
--format '{{range .Config.Env}}{{println .}}{{end}}' \
| grep -E '^CVAT_SERVERLESS='
Expected result:
CVAT_SERVERLESS=1
If the variable is missing, first inspect the resulting Compose configuration:
docker compose \
-f docker-compose.yml \
-f "$SERVERLESS_COMPOSE" \
config \
| grep -n -A 5 -B 5 'CVAT_SERVERLESS'
Then recreate the server and related worker containers:
docker compose \
-f docker-compose.yml \
-f "$SERVERLESS_COMPOSE" \
up -d --force-recreate
Use --force-recreate only if a normal startup did not apply the serverless settings.
2.7. Determining the Nuclio version
Get the full image name of the running container:
NUCLIO_IMAGE=$(
docker inspect nuclio \
--format '{{.Config.Image}}'
)
echo "$NUCLIO_IMAGE"
Example:
quay.io/nuclio/dashboard:1.13.0-amd64
Extract the version number:
NUCLIO_VERSION=$(
echo "$NUCLIO_IMAGE" \
| sed -E 's#.*:([0-9]+\.[0-9]+\.[0-9]+)(-[a-z0-9]+)?$#\1#'
)
echo "Nuclio version: $NUCLIO_VERSION"
Example result:
Nuclio version: 1.13.0
If the command prints the full image string instead of a version number, inspect it manually:
docker inspect nuclio \
--format '{{.Config.Image}}'
The version appears after the colon:
quay.io/nuclio/dashboard:1.13.0-amd64
└────┬────┘
version
2.8. Installing the nuctl utility
The nuctl CLI is required to deploy functions.
The nuctl version must match the Nuclio Dashboard version. This requirement is explicitly stated in the official CVAT documentation.
First, determine the server architecture:
uname -m
Convert it automatically to the architecture name used in Nuclio releases:
case "$(uname -m)" in
x86_64)
NUCTL_ARCH="amd64"
;;
aarch64|arm64)
NUCTL_ARCH="arm64"
;;
*)
echo "Unsupported architecture: $(uname -m)"
exit 1
;;
esac
echo "nuctl architecture: $NUCTL_ARCH"
Download the same nuctl version as the Nuclio Dashboard:
curl -fL \
"https://github.com/nuclio/nuclio/releases/download/${NUCLIO_VERSION}/nuctl-${NUCLIO_VERSION}-linux-${NUCTL_ARCH}" \
-o "/tmp/nuctl-${NUCLIO_VERSION}"
Install the binary:
sudo install \
-m 0755 \
"/tmp/nuctl-${NUCLIO_VERSION}" \
/usr/local/bin/nuctl
Check the path:
command -v nuctl
Expected result:
/usr/local/bin/nuctl
Check the version:
nuctl version
The Nuclio Dashboard and nuctl versions must match:
echo "Dashboard: $NUCLIO_VERSION"
nuctl version
2.9. Checking the nuctl connection to Nuclio
Request the list of projects:
nuctl get projects \
--platform local
If no models have been deployed yet, the list may be empty.
Request the list of functions:
nuctl get functions \
--platform local
Before the first model is installed, the command may return no functions. This is normal.
After successful model deployment, the list will show:
- function name;
- project;
- state;
- number of replicas;
- internal HTTP port.
A working function normally has the following state:
ready
2.10. Final installation check
Run the final diagnostic block:
echo "===== NUCLIO CONTAINER ====="
docker ps \
--filter name=nuclio \
--format 'table {{.Names}}\t{{.Image}}\t{{.Status}}\t{{.Ports}}'
echo
echo "===== CVAT SERVERLESS ====="
docker inspect cvat_server \
--format '{{range .Config.Env}}{{println .}}{{end}}' \
| grep -E '^CVAT_SERVERLESS=' \
|| echo "CVAT_SERVERLESS not found"
echo
echo "===== NUCTL VERSION ====="
nuctl version
echo
echo "===== NUCLIO PROJECTS ====="
nuctl get projects \
--platform local
echo
echo "===== NUCLIO FUNCTIONS ====="
nuctl get functions \
--platform local
If the Nuclio container is running, the nuctl version matches the Dashboard version, and nuctl get projects and nuctl get functions run without connection errors, the infrastructure is ready for the first model deployment.
In the next step, we will create and start an object detection function. The model will then appear in the CVAT interface.
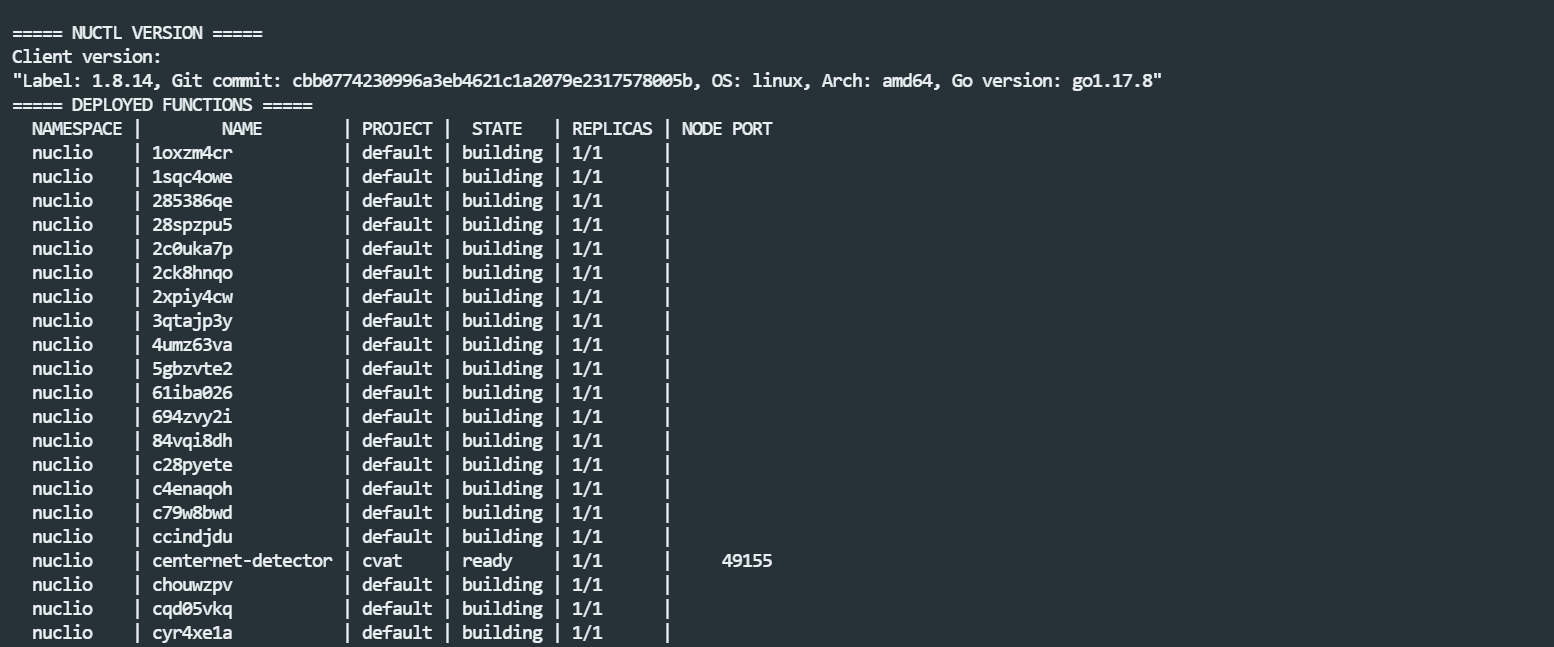
The running Nuclio service, the nuctl CLI version, and the list of deployed serverless functions.
3. Selecting a Model for the First Pre-annotation Run
To test the integration, we will use the YOLO v7 detector in ONNX format. It receives an image and returns object rectangles, class names, and confidence scores.
This example is convenient for the first run for several reasons:
- the model works as a standard object detector;
- the result is easy to inspect visually;
- CVAT creates standard rectangle annotations;
- ONNX Runtime is used for CPU inference;
- the model is already adapted to the CVAT serverless function interface.
The official CVAT repository includes YOLO v7 among its ready-made serverless models. The function is defined as a detector, runs an ONNX model, and returns objects from the 80 COCO classes.
We will first deploy the standard model. After testing the full workflow, you can replace it with your own ONNX model and modify the class list.
3.1. Why You Should Use Files from Your CVAT Version
Function structure, Python versions, Nuclio parameters, and Docker networking have changed between CVAT releases.
Do not copy a model directory from the develop branch into an older CVAT installation without checking compatibility. It is safer to use a serverless function from the same Git tag or commit as the running server.
Check the current repository version:
cd /opt/cvat
git branch --show-current
git describe --tags --always --dirty
git rev-parse --short HEAD
Example result:
develop
v2.70.0
a1b2c3d4
If the repository has local changes, git describe may add the following suffix:
-dirty
Do not update CVAT or switch Git branches until the model setup is complete.
3.2. Checking the serverless directory
Make sure the function directory exists:
test -d serverless \
&& echo "serverless directory found" \
|| echo "serverless directory not found"
Inspect its contents:
find serverless \
-maxdepth 3 \
-type d \
| sort \
| head -n 100
Find all functions whose names contain YOLO:
find serverless \
-type d \
-iname '*yolo*' \
| sort
In the current CVAT repository, the expected directory is:
serverless/onnx/WongKinYiu/yolov7/nuclio
Check it automatically:
YOLO_FUNCTION_DIR="serverless/onnx/WongKinYiu/yolov7/nuclio"
if [ -d "$YOLO_FUNCTION_DIR" ]; then
echo "YOLO function directory: OK"
echo "$YOLO_FUNCTION_DIR"
else
echo "YOLO v7 function directory: NOT FOUND"
fi
3.3. Option for an Older CVAT Version
Older repository versions may not include a ready-made YOLO v7 function. Other YOLO variants, such as OpenVINO YOLO v3, may be available instead.
Find all matching configuration files:
find serverless \
-type f \
\( -name 'function.yaml' -o -name 'function-gpu.yaml' \) \
-print0 \
| xargs -0 grep -il 'yolo' \
| sort
Also find detector-model directories:
grep -RIl \
--include='function.yaml' \
--include='function-gpu.yaml' \
'type: detector' \
serverless \
| sort
If YOLO v7 is unavailable, there are two options:
- use a compatible YOLO example included in the current CVAT version;
- prepare a custom Nuclio function for the platform version in use.
For the first deployment, the first option is preferable. It reduces the risk of incompatibility between CVAT, Nuclio, and the function response format.
3.4. Checking the YOLO v7 Function Files
The official example uses four main files:
function.yaml
function-gpu.yaml
main.py
model_handler.py
Check that they are present:
YOLO_FUNCTION_DIR="serverless/onnx/WongKinYiu/yolov7/nuclio"
for file in \
function.yaml \
function-gpu.yaml \
main.py \
model_handler.py
do
if [ -f "$YOLO_FUNCTION_DIR/$file" ]; then
printf '%-25s %s\n' "$file" "OK"
else
printf '%-25s %s\n' "$file" "NOT FOUND"
fi
done
Expected result:
function.yaml OK
function-gpu.yaml OK
main.py OK
model_handler.py OK
In the current official example, the directory contains separate CPU and GPU configurations, an HTTP handler, and a class for loading and running the ONNX model.
3.5. What Each File Does
function.yaml
The main Nuclio function configuration file for CPU deployment.
It defines:
- the internal function name;
- the display name of the model;
- the model type;
- the class list;
- the type of annotations created;
- the Python version;
- the Docker image;
- dependencies;
- the HTTP request handler;
- request size limits;
- the container restart policy.
Display the main parameters:
sed -n '1,45p' \
"$YOLO_FUNCTION_DIR/function.yaml"
Display the technical settings separately:
grep -nE \
'name:|type:|runtime:|handler:|baseImage:|eventTimeout:|maxRequestBodySize:' \
"$YOLO_FUNCTION_DIR/function.yaml"
In the official configuration, the model is registered as a detector, main:handler is used as the handler, and the classes use the rectangle annotation type.
function-gpu.yaml
An alternative configuration for running inference on an NVIDIA GPU.
Check which GPU resources it requests:
grep -nE \
'nvidia.com/gpu|baseImage:|onnxruntime-gpu|runtime:|handler:' \
"$YOLO_FUNCTION_DIR/function-gpu.yaml"
For the first run, we will use the CPU configuration. This allows us to test the integration independently of NVIDIA Container Toolkit and GPU settings.
main.py
The Nuclio HTTP handler.
It performs four main operations:
- receives a JSON request from CVAT;
- decodes the image;
- passes the image to the model handler;
- returns the detected objects as JSON.
Display the beginning of the file:
sed -n '1,220p' \
"$YOLO_FUNCTION_DIR/main.py"
Find the main function:
grep -nE \
'^def handler|^def init_context' \
"$YOLO_FUNCTION_DIR/main.py"
init_context normally loads the model once when the container starts, while handler processes each incoming request.
model_handler.py
This file contains the main inference logic:
- loading the ONNX model;
- preparing the image;
- resizing the input image;
- running ONNX Runtime;
- processing the output tensors;
- converting coordinates;
- building the list of detected objects.
Check the imported libraries:
grep -nE \
'^import |^from ' \
"$YOLO_FUNCTION_DIR/model_handler.py"
Find the handler class:
grep -nE \
'^class |^[[:space:]]+def ' \
"$YOLO_FUNCTION_DIR/model_handler.py" \
| head -n 40
3.6. Checking Model Metadata for CVAT
CVAT reads model information from the metadata.annotations section of function.yaml.
Display the beginning of the configuration:
sed -n '1,30p' \
"$YOLO_FUNCTION_DIR/function.yaml"
The main fields look like this:
metadata:
name: onnx-wongkinyiu-yolov7
namespace: cvat
annotations:
name: YOLO v7
type: detector
spec: |
[
{ "id": 0, "name": "person", "type": "rectangle" },
{ "id": 1, "name": "bicycle", "type": "rectangle" },
{ "id": 2, "name": "car", "type": "rectangle" }
]
Field descriptions:
|
Field |
Purpose |
|
metadata.name |
System name of the Nuclio function |
|
namespace |
Function namespace |
|
annotations.name |
Model name displayed in the CVAT interface |
|
annotations.type |
Model type |
|
annotations.spec |
Classes and annotation types created |
|
id |
Numeric model class identifier |
|
name |
Class name |
|
type |
CVAT annotation type |
A bounding box detector uses:
"type": "rectangle"
The class names from annotations.spec will later be mapped to the labels in the CVAT task.
3.7. Checking the Deployment Command
In the current CVAT repository, the function is deployed with the following script:
serverless/deploy_cpu.sh
Inspect its contents:
sed -n '1,220p' serverless/deploy_cpu.sh
Check the execute permission:
ls -l serverless/deploy_cpu.sh
If the executable bit is missing:
chmod +x serverless/deploy_cpu.sh
The script performs several actions:
- enables Docker BuildKit;
- creates the cvat project in Nuclio;
- finds function.yaml;
- runs nuctl deploy;
- connects the function to the CVAT Docker network;
- passes the Redis address;
- prints the final list of functions.
In the current official script, functions are connected to the cvat_cvat network, and CVAT_FUNCTIONS_REDIS_HOST and CVAT_FUNCTIONS_REDIS_PORT are passed as parameters.
Check the actual Docker network name on the server:
docker network ls \
--format 'table {{.Name}}\t{{.Driver}}\t{{.Scope}}' \
| grep -Ei 'NAME|cvat'
The network is usually named:
cvat_cvat
With a different Compose project name, however, it may be called something else, for example:
annotation_cvat
razmetka_cvat
To see which networks cvat_server is connected to, run:
docker inspect cvat_server \
--format '{{range $name, $value := .NetworkSettings.Networks}}{{println $name}}{{end}}'
You will need this network name when deploying a custom model manually.
3.8. Final Check Before Building
Run the following combined check:
cd /opt/cvat
YOLO_FUNCTION_DIR="serverless/onnx/WongKinYiu/yolov7/nuclio"
echo "===== CVAT VERSION ====="
git describe --tags --always --dirty
git rev-parse --short HEAD
echo
echo "===== YOLO DIRECTORY ====="
if [ -d "$YOLO_FUNCTION_DIR" ]; then
echo "$YOLO_FUNCTION_DIR: OK"
else
echo "$YOLO_FUNCTION_DIR: NOT FOUND"
fi
echo
echo "===== YOLO FILES ====="
for file in \
function.yaml \
function-gpu.yaml \
main.py \
model_handler.py
do
test -f "$YOLO_FUNCTION_DIR/$file" \
&& echo "$file: OK" \
|| echo "$file: NOT FOUND"
done
echo
echo "===== FUNCTION METADATA ====="
if [ -f "$YOLO_FUNCTION_DIR/function.yaml" ]; then
grep -nE \
'name: YOLO|type: detector|runtime:|handler:|baseImage:' \
"$YOLO_FUNCTION_DIR/function.yaml"
fi
echo
echo "===== CVAT NETWORK ====="
docker inspect cvat_server \
--format '{{range $name, $value := .NetworkSettings.Networks}}{{println $name}}{{end}}'
echo
echo "===== NUCTL ====="
nuctl version
If the directory and all four files are present, nuctl prints its version without errors, and the CVAT Docker network is identified, you can proceed to building and deploying the model.
3.2. Finding the Working Directory of the Installed CVAT Instance
All commands for deploying serverless models must be run from the root directory of the CVAT repository.
If you run:
find serverless
from the user's home directory, the system will look for:
/root/serverless
and return the following error:
find: ‘serverless’: No such file or directory
This does not mean that CVAT or Nuclio is installed incorrectly. First determine the directory from which Docker Compose was started.
Determining the working directory from the CVAT container
Docker Compose containers include service labels with project information.
Display the Compose project name:
docker inspect cvat_server \
--format '{{ index .Config.Labels "com.docker.compose.project" }}'
Expected result:
cvat
Get the project working directory:
docker inspect cvat_server \
--format '{{ index .Config.Labels "com.docker.compose.project.working_dir" }}'
For example:
/root/cvat
or:
/opt/cvat
See which Compose files were used to start the project:
docker inspect cvat_server \
--format '{{ index .Config.Labels "com.docker.compose.project.config_files" }}'
Example result:
/root/cvat/docker-compose.yml,/root/cvat/docker-compose.override.yml
For convenience, save the discovered directory in a variable:
CVAT_DIR=$(
docker inspect cvat_server \
--format '{{ index .Config.Labels "com.docker.compose.project.working_dir" }}'
)
echo "CVAT directory: $CVAT_DIR"
Check that the directory exists:
if [ -n "$CVAT_DIR" ] && [ -d "$CVAT_DIR" ]; then
echo "CVAT directory found: $CVAT_DIR"
else
echo "The working directory could not be determined from Docker labels"
fi
If the path was detected, change to it:
cd "$CVAT_DIR"
Check the current location:
pwd
Inspect the directory contents:
ls -la
The root of a standard CVAT installation should contain the main Compose file:
docker-compose.yml
Check that it exists:
test -f docker-compose.yml \
&& echo "docker-compose.yml: OK" \
|| echo "docker-compose.yml: NOT FOUND"
If the working-directory label is missing
In older Docker Compose versions, the working_dir service label may be missing or may return an empty string.
Display all Compose labels for the container:
docker inspect cvat_server \
--format '{{json .Config.Labels}}' \
| python3 -m json.tool
If Python is unavailable:
docker inspect cvat_server \
--format '{{json .Config.Labels}}'
Also inspect the directories mounted into the container:
docker inspect cvat_server \
--format '{{range .Mounts}}{{println .Source "->" .Destination}}{{end}}'
Then perform a limited search for Compose files in the usual locations:
sudo find \
/opt \
/srv \
/home \
/root \
-maxdepth 6 \
-type f \
\( \
-name 'docker-compose.yml' \
-o -name 'docker-compose.yaml' \
-o -name 'compose.yml' \
-o -name 'compose.yaml' \
\) \
2>/dev/null \
| sort
Look for a directory that contains all of the following:
docker-compose.yml
cvat/
serverless/
components/
The exact set of directories depends on the CVAT version.
Verifying that the directory is the CVAT repository
After changing to the presumed directory, run:
pwd
git remote -v 2>/dev/null || true
git branch --show-current 2>/dev/null || true
git describe --tags --always --dirty 2>/dev/null || true
git rev-parse --short HEAD 2>/dev/null || true
Check the main files:
for path in \
docker-compose.yml \
cvat \
serverless
do
if [ -e "$path" ]; then
printf '%-25s %s\n' "$path" "FOUND"
else
printf '%-25s %s\n' "$path" "NOT FOUND"
fi
done
Finding the serverless directory
The search is now performed relative to the CVAT root:
find . \
-maxdepth 4 \
-type d \
-iname '*serverless*' \
| sort
For most CVAT versions, the expected directory is:
./serverless
Official CVAT serverless model examples are stored in the platform repository and are deployed with nuctl and the scripts in the serverless directory.
Check it:
if [ -d serverless ]; then
echo "serverless directory found"
else
echo "serverless directory is missing from the current checkout"
fi
If the directory is present, list the available models:
find serverless \
-mindepth 1 \
-maxdepth 4 \
-type d \
| sort \
| head -n 150
Find models from the YOLO family:
find serverless \
-type d \
-iname '*yolo*' \
| sort
Why Nuclio Can Work Without the serverless Directory
The serverless directory is needed while preparing and deploying a function. After the build, the model runs as an independent Docker container.
This means the following situation is possible:
- the Nuclio container is running;
- a previously deployed model is running;
- the original model directory was moved or deleted;
- the current command was run from a different repository checkout;
- CVAT is started from one directory, while the models were deployed from another.
A missing source directory does not directly affect an already deployed function. However, the function source files are required to install a new model.
Final diagnostic command
Run the following combined check:
echo "===== COMPOSE PROJECT ====="
docker inspect cvat_server \
--format 'Project: {{ index .Config.Labels "com.docker.compose.project" }}'
docker inspect cvat_server \
--format 'Working directory: {{ index .Config.Labels "com.docker.compose.project.working_dir" }}'
docker inspect cvat_server \
--format 'Compose files: {{ index .Config.Labels "com.docker.compose.project.config_files" }}'
echo
echo "===== CURRENT DIRECTORY ====="
pwd
echo
echo "===== CONTAINER NETWORKS ====="
docker inspect cvat_server \
--format '{{range $name, $value := .NetworkSettings.Networks}}{{println $name}}{{end}}'
echo
echo "===== CONTAINER MOUNTS ====="
docker inspect cvat_server \
--format '{{range .Mounts}}{{println .Source "->" .Destination}}{{end}}'
According to the current diagnostics, the Docker network has already been identified:
cvat_cvat
This network will be used when deploying the new Nuclio function.
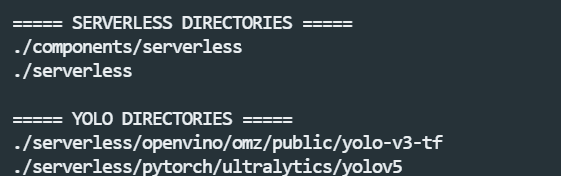
Determining the Docker Compose working directory and locating serverless model source files in the installed CVAT repository.
3. Selecting the Built-in YOLOv5 Model
The set of ready-made serverless models differs between CVAT versions. Before deployment, check which functions are included in the installed platform version.
The installation used in this guide includes two models from the YOLO family:
serverless/openvino/omz/public/yolo-v3-tf
serverless/pytorch/ultralytics/yolov5
For the first run, we will use Ultralytics YOLOv5 on PyTorch.
This model performs object detection: it finds objects in an image and returns rectangles, class names, and confidence scores. CVAT converts the results into rectangle annotations.
Using the model from the current Git checkout is preferable to copying a new function from the develop branch. The serverless function must be compatible with the installed CVAT, Nuclio, and Python versions.
The official CVAT documentation also recommends deploying built-in functions from the serverless directory in the cloned repository. After deployment, the function becomes available to CVAT for automatic annotation.
3.1. Checking the CVAT Version
Change to the installation root directory:
cd /root/cvat
Check the Git branch, tag, and commit:
echo "===== CVAT VERSION ====="
git branch --show-current
git describe --tags --always --dirty
git rev-parse --short HEAD
Also display the date of the latest commit:
git log -1 \
--date=iso \
--format='Commit: %H%nDate: %ad%nSubject: %s'
Save this information. It will help reproduce the installation and select compatible component versions.
Until the model setup is complete, do not run:
git pull
or switch CVAT to another branch. Updating the source code may require database migrations and rebuilding all containers.
3.2. Checking the YOLOv5 Directory
Set the path to the built-in model:
YOLO_ROOT="/root/cvat/serverless/pytorch/ultralytics/yolov5"
Check that the directory exists:
if [ -d "$YOLO_ROOT" ]; then
echo "YOLOv5 directory: OK"
else
echo "YOLOv5 directory: NOT FOUND"
fi
Inspect its structure:
find "$YOLO_ROOT" \
-maxdepth 4 \
-type f \
| sort
The nuclio directory containing the serverless function source files is normally located inside:
serverless/pytorch/ultralytics/yolov5/
└── nuclio/
├── function.yaml
└── main.py
Some versions may also contain:
function-gpu.yaml
model_handler.py
README.md
The exact file set depends on the CVAT version.
3.3. Detecting the Function Directory Automatically
Find the CPU configuration:
YOLO_FUNCTION_FILE=$(
find "$YOLO_ROOT" \
-type f \
-name 'function.yaml' \
| head -n 1
)
echo "Function file: $YOLO_FUNCTION_FILE"
Determine the directory that must be passed to the deployment script:
YOLO_FUNCTION_DIR=$(
dirname "$YOLO_FUNCTION_FILE"
)
echo "Function directory: $YOLO_FUNCTION_DIR"
Check the result:
test -f "$YOLO_FUNCTION_DIR/function.yaml" \
&& echo "function.yaml: OK" \
|| echo "function.yaml: NOT FOUND"
test -f "$YOLO_FUNCTION_DIR/main.py" \
&& echo "main.py: OK" \
|| echo "main.py: NOT FOUND"
Expected directory:
/root/cvat/serverless/pytorch/ultralytics/yolov5/nuclio
3.4. Inspecting the Model Configuration
function.yaml defines how Nuclio builds and starts the model container.
Display its contents:
sed -n '1,240p' \
"$YOLO_FUNCTION_DIR/function.yaml"
For a shorter check, display only the key parameters:
grep -nE \
'^[[:space:]]*name:|type:|framework:|runtime:|handler:|baseImage:|image:|commands:|spec:' \
"$YOLO_FUNCTION_DIR/function.yaml"
The following fields are important:
|
Parameter |
Purpose |
|
metadata.name |
System name of the Nuclio function |
|
annotations.name |
Model name displayed in the CVAT interface |
|
annotations.type |
Model type, such as detector |
|
annotations.framework |
ML framework in use |
|
annotations.spec |
Model class list |
|
runtime |
Python runtime version |
|
handler |
Function that receives requests |
|
baseImage |
Base Docker image |
|
build.commands |
Dependency installation commands |
Display the metadata separately:
sed -n '/metadata:/,/spec:/p' \
"$YOLO_FUNCTION_DIR/function.yaml"
Find the name under which the function will be registered in Nuclio:
awk '
/^metadata:/ {
metadata=1
next
}
metadata && /^[[:space:]]{2}name:/ {
exit
}
' "$YOLO_FUNCTION_DIR/function.yaml"
Check the model type:
grep -n \
'type: detector' \
"$YOLO_FUNCTION_DIR/function.yaml"
If the output contains:
type: detector
CVAT will treat the function as an object detector.
3.5. Checking the Model Classes
The standard YOLOv5 configuration uses the COCO dataset classes. They include:
person
bicycle
car
motorcycle
bus
truck
dog
cat
chair
bottle
The full list is stored in annotations.spec.
Display this section:
grep -n -A 100 \
'spec:' \
"$YOLO_FUNCTION_DIR/function.yaml" \
| head -n 110
Class names are important: when pre-annotation starts, CVAT will ask you to map model classes to task labels.
For example:
Model class: person
Task label: Person
or:
Model class: car
Task label: Car
The names do not have to match exactly; you can map them manually before starting annotation.
3.6. Checking the HTTP Handler Code
Open main.py:
sed -n '1,260p' \
"$YOLO_FUNCTION_DIR/main.py"
Find the initialization and request-handling functions:
grep -nE \
'^def |^[[:space:]]+def ' \
"$YOLO_FUNCTION_DIR/main.py"
The file usually contains two main functions:
def init_context(context):
...
and:
def handler(context, event):
...
init_context is called when the container starts. The model is loaded at this stage.
handler is called for every CVAT request. It:
- receives an image;
- decodes it;
- runs inference;
- converts predictions to the CVAT format;
- returns a JSON object list.
YOLOv5 functions from that period may load the model through torch.hub.load. The ready-made CVAT example already contains the required code, so main.py does not need to be changed before the first run. Connecting custom weights requires separate modifications and should be done only after testing the standard model.
Check which model is loaded:
grep -nE \
'torch\.hub\.load|yolov5[nsmlx]|model =' \
"$YOLO_FUNCTION_DIR/main.py"
For example, the line may contain:
torch.hub.load("ultralytics/yolov5", "yolov5s")
yolov5s is the compact model variant. It is suitable for an initial CPU deployment because it requires less memory than the larger versions.
3.7. Checking the CVAT Deployment Script
Change to the CVAT root directory:
cd /root/cvat
Check that the CPU deployment script exists:
test -f serverless/deploy_cpu.sh \
&& echo "deploy_cpu.sh: OK" \
|| echo "deploy_cpu.sh: NOT FOUND"
Check its permissions:
ls -l serverless/deploy_cpu.sh
If the file is not executable:
chmod +x serverless/deploy_cpu.sh
Inspect the script contents:
sed -n '1,260p' \
serverless/deploy_cpu.sh
Pay particular attention to:
- the Nuclio project name;
- the Docker network;
- the Redis address;
- the nuctl deploy parameters;
- the method used to locate function.yaml.
Display only the relevant lines:
grep -nE \
'nuctl|project|network|redis|function.yaml|platform|deploy' \
serverless/deploy_cpu.sh
3.8. Checking the Docker network
The Nuclio function must be connected to the same network that CVAT uses to communicate with its services.
Check the server network:
docker inspect cvat_server \
--format '{{range $name, $value := .NetworkSettings.Networks}}{{println $name}}{{end}}'
For the installation used in this guide, the result is:
cvat_cvat
Check the existing function:
docker inspect nuclio-nuclio-centernet-detector \
--format '{{range $name, $value := .NetworkSettings.Networks}}{{println $name}}{{end}}'
The output should also contain:
cvat_cvat
This confirms that the model and CVAT share the same Docker network.
3.9. Checking Whether YOLOv5 Is Already Deployed
Display the list of Nuclio functions:
nuctl get functions \
--platform local
Also check the Docker containers:
docker ps -a \
--format 'table {{.Names}}\t{{.Image}}\t{{.Status}}' \
| grep -Ei 'NAME|yolo|nuclio'
If YOLOv5 is not listed, it can be deployed without a function-name conflict.
If the function already exists, first inspect its status and configuration. Redeploying with the same name may update the existing function.
3.10. Running the Final Check
Run the combined diagnostic block:
cd /root/cvat
YOLO_ROOT="/root/cvat/serverless/pytorch/ultralytics/yolov5"
YOLO_FUNCTION_FILE=$(
find "$YOLO_ROOT" \
-type f \
-name 'function.yaml' \
| head -n 1
)
YOLO_FUNCTION_DIR=$(
dirname "$YOLO_FUNCTION_FILE"
)
echo "===== CVAT VERSION ====="
git describe --tags --always --dirty
git rev-parse --short HEAD
echo
echo "===== YOLO FUNCTION DIRECTORY ====="
echo "$YOLO_FUNCTION_DIR"
echo
echo "===== YOLO FILES ====="
find "$YOLO_FUNCTION_DIR" \
-maxdepth 2 \
-type f \
| sort
echo
echo "===== FUNCTION PARAMETERS ====="
grep -nE \
'name:|type: detector|framework:|runtime:|handler:|baseImage:' \
"$YOLO_FUNCTION_DIR/function.yaml"
echo
echo "===== MODEL LOADING ====="
grep -nE \
'torch\.hub\.load|yolov5[nsmlx]|model =' \
"$YOLO_FUNCTION_DIR/main.py"
echo
echo "===== CVAT NETWORK ====="
docker inspect cvat_server \
--format '{{range $name, $value := .NetworkSettings.Networks}}{{println $name}}{{end}}'
echo
echo "===== EXISTING FUNCTIONS ====="
nuctl get functions \
--platform local
At this stage, we have only inspected the function. Building the Docker image and downloading the weights will begin in the next step.
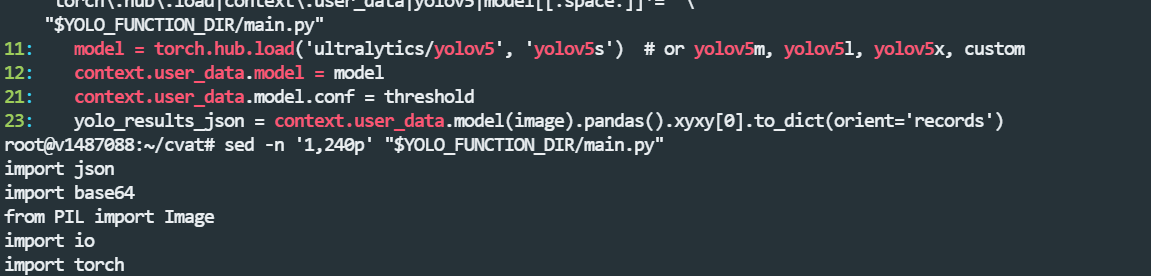
Checking the built-in YOLOv5 serverless function configuration before deploying it to Nuclio.
4. Deploying YOLOv5 in Nuclio
After checking the configuration, you can build the serverless function and connect it to CVAT.
This platform version uses the following built-in function:
serverless/pytorch/ultralytics/yolov5/nuclio
Its configuration contains the following parameters:
Function name: ultralytics-yolov5
Name in CVAT: YOLO v5
Type: detector
Framework: PyTorch
Runtime: Python 3.6
Base image: ultralytics/yolov5:latest-cpu
Handler: main:handler
In the older CVAT version, this function is designed for Nuclio 1.8.14 and Python 3.6. Do not change the runtime to Python 3.8, 3.9, or a newer version before the first run, because this may break compatibility with the base image and function code.
Python 3.6 was already considered deprecated in Nuclio 1.8.14, but it is better to leave it unchanged for this older built-in CVAT example until the test deployment succeeds. With newer CVAT versions, use the model configuration from the corresponding repository checkout.
4.1. Changing to the CVAT Directory
cd /root/cvat
Check the current directory:
pwd
Expected result:
/root/cvat
Set the path to the function:
YOLO_FUNCTION_DIR="serverless/pytorch/ultralytics/yolov5/nuclio"
Check the main files:
test -f "$YOLO_FUNCTION_DIR/function.yaml" \
&& echo "function.yaml: OK" \
|| echo "function.yaml: NOT FOUND"
test -f "$YOLO_FUNCTION_DIR/main.py" \
&& echo "main.py: OK" \
|| echo "main.py: NOT FOUND"
Expected result:
function.yaml: OK
main.py: OK
4.2. Checking How the Model Is Loaded
Display the part of main.py responsible for initialization:
grep -nE \
'def init_context|torch\.hub\.load|context\.user_data|yolov5|model[[:space:]]*=' \
"$YOLO_FUNCTION_DIR/main.py"
The standard YOLOv5 function usually loads the model when the container starts and stores it in context.user_data.
Example:
def init_context(context):
model = torch.hub.load(...)
context.user_data.model = model
Loading the model in init_context is important: the neural network weights and structure are loaded once when the container starts, rather than for every image.
Display the full file:
sed -n '1,240p' \
"$YOLO_FUNCTION_DIR/main.py"
Do not modify main.py before the first deployment.
4.3. Creating a Configuration Backup
Save the original files before making changes:
BACKUP_DIR="/root/cvat-model-backups/yolov5-$(date +%Y%m%d-%H%M%S)"
mkdir -p "$BACKUP_DIR"
cp \
"$YOLO_FUNCTION_DIR/function.yaml" \
"$YOLO_FUNCTION_DIR/main.py" \
"$BACKUP_DIR/"
Check the backup:
find "$BACKUP_DIR" \
-maxdepth 1 \
-type f \
-ls
The files will be stored outside the Git repository:
/root/cvat-model-backups/
4.4. Checking the version nuctl
The CLI version must match the Nuclio Dashboard version.
Display the image used by the running Nuclio container:
docker inspect nuclio \
--format '{{.Config.Image}}'
For the server used in this guide:
quay.io/nuclio/dashboard:1.8.14-amd64
Check the client:
nuctl version
The output should contain the following version:
1.8.14
You can also run:
echo "Nuclio Dashboard:"
docker inspect nuclio \
--format '{{.Config.Image}}'
echo
echo "nuctl:"
nuctl version
Do not deploy the function if the versions do not match.
4.5. Checking the Docker Network
The function must be on the same Docker network as CVAT.
CVAT_NETWORK=$(
docker inspect cvat_server \
--format '{{range $name, $value := .NetworkSettings.Networks}}{{println $name}}{{end}}' \
| head -n 1
)
echo "CVAT network: $CVAT_NETWORK"
For the installation used in this guide:
CVAT network: cvat_cvat
Check that the network exists:
docker network inspect "$CVAT_NETWORK" \
>/dev/null \
&& echo "Docker network: OK"
4.6. Checking the base image YOLOv5
function.yaml uses the following base image:
ultralytics/yolov5:latest-cpu
Check whether it is already available on the server:
docker image inspect \
ultralytics/yolov5:latest-cpu \
>/dev/null 2>&1 \
&& echo "Base image is already available" \
|| echo "Base image is not downloaded"
List existing local YOLO images:
docker images \
--digests \
ultralytics/yolov5
If the image is missing, download it separately:
docker pull ultralytics/yolov5:latest-cpu
Downloading it separately makes it possible to detect Docker Hub, DNS, disk-space, or authentication problems before the full Nuclio build starts.
After downloading, record the image identifier:
docker image inspect \
ultralytics/yolov5:latest-cpu \
--format 'Image ID: {{.Id}}{{println}}Created: {{.Created}}{{println}}Digests: {{json .RepoDigests}}'
The latest-cpu tag is mutable, so save the image ID or digest in the project's technical documentation.
4.7. Checking Available Disk Space
Building the function creates additional Docker layers.
df -h /
Check Docker disk usage:
docker system df
Do not run the following command before the build:
docker system prune -a
This command may remove unused images required by other containers or needed for a quick rollback.
4.8. Checking Existing Functions
nuctl get functions \
--platform local
Another function may already be deployed on the server, for example:
centernet-detector
This does not interfere with YOLOv5 because the model uses a different system name:
ultralytics-yolov5
Also check the containers:
docker ps -a \
--format 'table {{.Names}}\t{{.Image}}\t{{.Status}}' \
| grep -Ei 'NAME|nuclio|yolov5|centernet'
4.9. Checking the deploy_cpu.sh Script
CVAT includes a helper script for deploying CPU functions:
ls -l serverless/deploy_cpu.sh
If the file is not executable:
chmod +x serverless/deploy_cpu.sh
Inspect the parameters it passes to Nuclio:
grep -nE \
'nuctl|project|platform|network|redis|deploy' \
serverless/deploy_cpu.sh
The official method for deploying a built-in CVAT CPU function is to pass the directory containing function.yaml and the handler source code to the script.
4.10. Starting the Build and Deployment
From the CVAT root directory, run:
cd /root/cvat
Start the function:
./serverless/deploy_cpu.sh \
serverless/pytorch/ultralytics/yolov5/nuclio
To save the full log at the same time, use:
set -o pipefail
./serverless/deploy_cpu.sh \
serverless/pytorch/ultralytics/yolov5/nuclio \
2>&1 \
| tee "/root/yolov5-deploy-$(date +%Y%m%d-%H%M%S).log"
During deployment, Nuclio will:
- read function.yaml;
- download the required Docker images;
- prepare the Python handler;
- build the final function image;
- create the model container;
- connect it to the CVAT Docker network;
- register the function in the cvat project;
- check that the HTTP handler is ready.
The build may display a warning that Python 3.6 is deprecated. For this function version, the warning itself does not indicate a failure.
A successful deployment is usually accompanied by messages such as:
Build complete
Function deploy complete
Function is ready
The final function state is what matters, rather than warnings printed during the build.
4.11. Checking the Function Status
After the build finishes, run:
nuctl get functions \
--platform local
The YOLOv5 function should appear in the list with the following status:
ready
Check the Docker container:
docker ps \
--format 'table {{.Names}}\t{{.Image}}\t{{.Status}}\t{{.Ports}}' \
| grep -Ei 'NAME|yolov5'
The container name usually starts with:
nuclio-nuclio-ultralytics-yolov5
Get the exact name automatically:
YOLO_CONTAINER=$(
docker ps \
--format '{{.Names}}' \
| grep -i 'yolov5' \
| head -n 1
)
echo "YOLO container: $YOLO_CONTAINER"
Check the status:
docker inspect "$YOLO_CONTAINER" \
--format 'Status: {{.State.Status}}{{println}}Started: {{.State.StartedAt}}{{println}}Restarting: {{.State.Restarting}}'
4.12. Checking the Function Log
docker logs \
--tail 100 \
"$YOLO_CONTAINER"
To show only errors:
docker logs \
"$YOLO_CONTAINER" \
2>&1 \
| grep -Ei \
'error|exception|traceback|failed'
If the second command returns no output, the current log contains no lines matching the usual error indicators.
Check whether the container is restarting:
docker inspect "$YOLO_CONTAINER" \
--format 'Restart count: {{.RestartCount}}'
Expected result:
Restart count: 0
4.13. Checking the CVAT Network Connection
docker inspect "$YOLO_CONTAINER" \
--format '{{range $name, $value := .NetworkSettings.Networks}}{{println $name}}{{end}}'
The output should contain the network:
cvat_cvat
Check the networks of CVAT and the model together:
echo "CVAT server networks:"
docker inspect cvat_server \
--format '{{range $name, $value := .NetworkSettings.Networks}}{{println $name}}{{end}}'
echo
echo "YOLOv5 networks:"
docker inspect "$YOLO_CONTAINER" \
--format '{{range $name, $value := .NetworkSettings.Networks}}{{println $name}}{{end}}'
4.14. Final Check
cd /root/cvat
YOLO_CONTAINER=$(
docker ps \
--format '{{.Names}}' \
| grep -i 'yolov5' \
| head -n 1
)
echo "===== NUCTL FUNCTIONS ====="
nuctl get functions \
--platform local
echo
echo "===== YOLO CONTAINER ====="
docker ps \
--filter "name=$YOLO_CONTAINER" \
--format 'table {{.Names}}\t{{.Image}}\t{{.Status}}\t{{.Ports}}'
echo
echo "===== YOLO NETWORKS ====="
docker inspect "$YOLO_CONTAINER" \
--format '{{range $name, $value := .NetworkSettings.Networks}}{{println $name}}{{end}}'
echo
echo "===== RESTART COUNT ====="
docker inspect "$YOLO_CONTAINER" \
--format '{{.RestartCount}}'
echo
echo "===== LAST LOG LINES ====="
docker logs \
--tail 20 \
"$YOLO_CONTAINER"
If the function has the ready state, the container is running, it is connected to the cvat_cvat network, and it is not stuck in a restart loop, the model has been deployed successfully.
In the next step, we will confirm that YOLOv5 appears in the CVAT interface, create a test task, and run automatic pre-annotation.
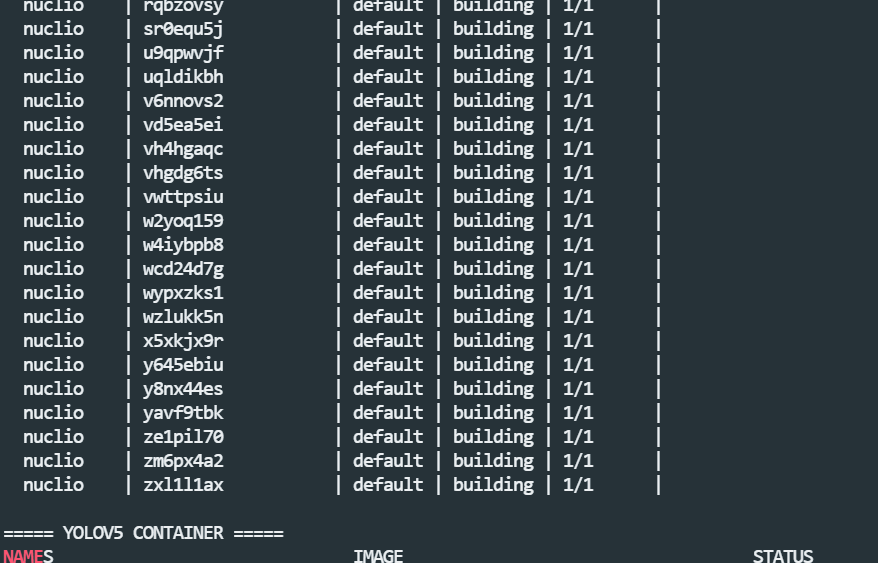
A successfully deployed YOLOv5 function in Nuclio and the running model container.
5. Running Automatic Pre-annotation in CVAT
After deployment, check the function status:
cd /root/cvat
nuctl get functions --platform local
The ultralytics-yolov5 function should have the ready status.
Also check the container:
docker ps \
--format 'table {{.Names}}\t{{.Status}}' \
| grep -Ei 'NAME|yolov5'
Checking the Model in the Interface
Open CVAT and go to the Modelspage. The following model should appear in the list:
YOLO v5
The Models page lists serverless models that have been deployed and are available for automatic or semi-automatic annotation.
If the model does not appear, refresh the page and check:
nuctl get functions --platform local
docker logs --tail 100 nuclio
Creating a Test Task
Create a new task and upload 5–10 images containing objects that YOLOv5 can recognize.
Add several labels:
person
car
bicycle
dog
cat
For the first test, it is easier to use English label names that match the model classes. You can map the model to labels in another language later.
Starting Automatic Annotation
Open the Taskspage, find the test task, and select:
Actions → Automatic annotation
In the dialog that opens:
- Select the YOLO v5 model.
- Map the model classes to the task labels.
- Set the confidence threshold to 0.5.
- Click Annotate.
The standard CVAT workflow also includes selecting a model, mapping labels, and setting a confidence threshold before processing begins.
Example mapping:
|
YOLOv5 class |
Task label |
|
person |
person |
|
car |
car |
|
dog |
dog |
Classes that are not needed can be left unmapped.
Parameter Clean old annotations removes existing annotations before the model runs. It is not required for an empty test task.
Monitoring the Model
While processing is running, open a second SSH session and follow the container log:
YOLO_CONTAINER=$(
docker ps \
--format '{{.Names}}' \
| grep -i yolov5 \
| head -n 1
)
docker logs \
--follow \
--tail 50 \
"$YOLO_CONTAINER"
When processing finishes, CVAT will show that the operation is complete. Open the task and go to the Job.
The images should now contain rectangles labeled with the model's class names.
If too few objects are detected, lower the threshold to 0.3. If the model creates too many incorrect rectangles, increase it to 0.6–0.7.
Automatic annotation does not replace human review. The annotator must remove false positives, add missed objects, and correct bounding-box boundaries.
Open the Taskssection, find the required task, and open the Actions menu on its card. In some CVAT versions, this menu is represented by a three-dot icon. Select Automatic annotation.
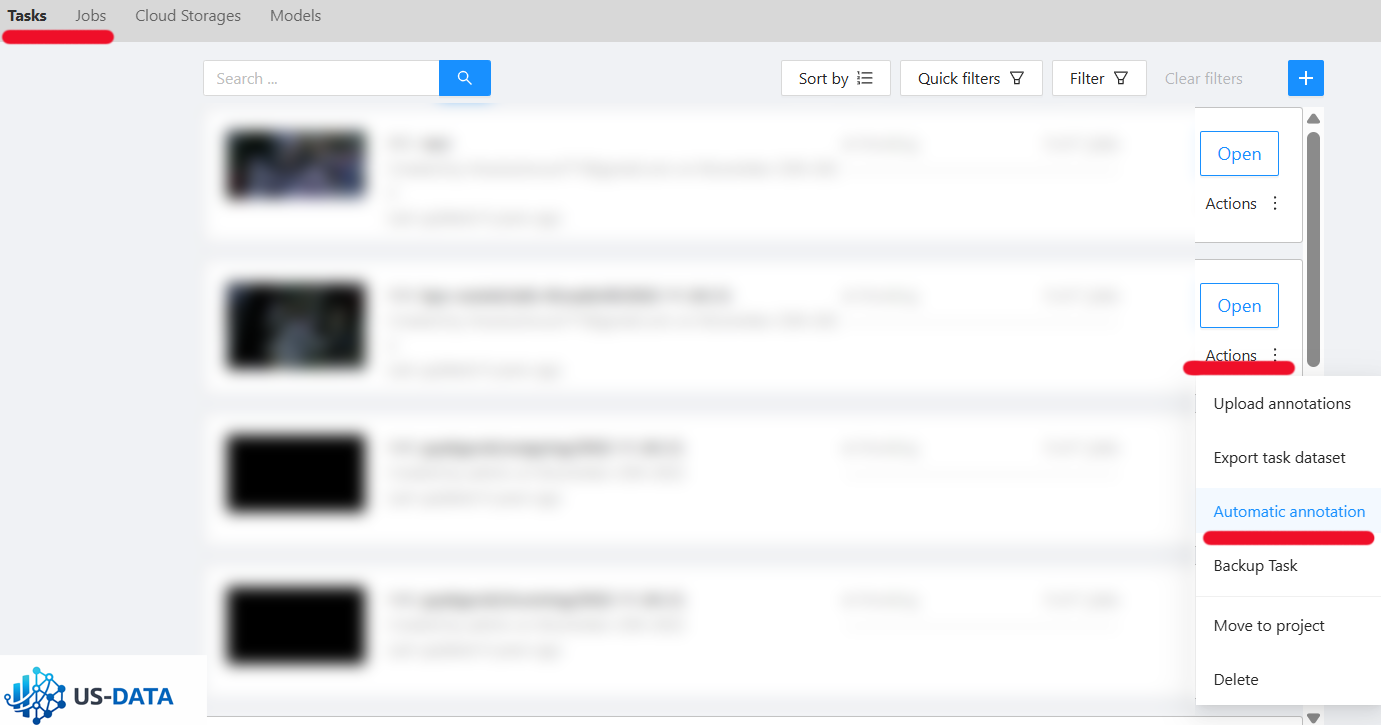
CVAT: Tasks → open the task → Actions → Automatic annotation
6. Checking the Pre-annotation Results
After Automatic annotation is complete, open the task and go to the Job. CVAT should add the detected objects as standard editable rectangles.
The annotator should check:
- whether the correct object class was selected;
- whether the bounding box extends beyond the object boundaries;
- whether any objects were missed;
- whether there are any false positives;
- whether partially occluded objects were annotated.
Automatic annotation creates a preliminary result but does not replace manual quality control. CVAT lets you map model classes to task labels before processing starts.
Selecting a Confidence Threshold
For the first run, you can use:
0.5
Practical settings:
- 0.3–0.4 — the model detects more objects, but the number of errors increases;
- 0.5 — a suitable starting value;
- 0.6–0.7 — fewer false positives, but more missed objects.
Determine the optimal threshold on a small test set before applying it to the entire dataset.
Checking the Model on the Server
Display the function status:
nuctl get functions --platform local
Find the YOLOv5 container:
YOLO_CONTAINER=$(
docker ps \
--format '{{.Names}}' \
| grep -i yolov5 \
| head -n 1
)
echo "$YOLO_CONTAINER"
Check the latest requests:
docker logs \
--tail 100 \
"$YOLO_CONTAINER"
To follow the log while pre-annotation is running:
docker logs \
--follow \
--tail 30 \
"$YOLO_CONTAINER"
Stop viewing the log with:
Ctrl+C
This does not stop the container or the task processing operation.
If No Annotations Appear
Check the function state:
nuctl get functions --platform local
It should have the ready status.
Check the container for errors:
docker logs "$YOLO_CONTAINER" 2>&1 \
| grep -Ei 'error|exception|traceback|failed'
Check that the model is connected to the CVAT network:
docker inspect "$YOLO_CONTAINER" \
--format '{{range $name, $value := .NetworkSettings.Networks}}{{println $name}}{{end}}'
Expected network:
cvat_cvat
If the function is running but no objects are detected:
- lower the confidence threshold;
- use images containing COCO classes;
- check the class mapping;
- make sure the images open correctly in CVAT.
After reviewing the result, save the corrected annotations with the Save button in the Job interface.
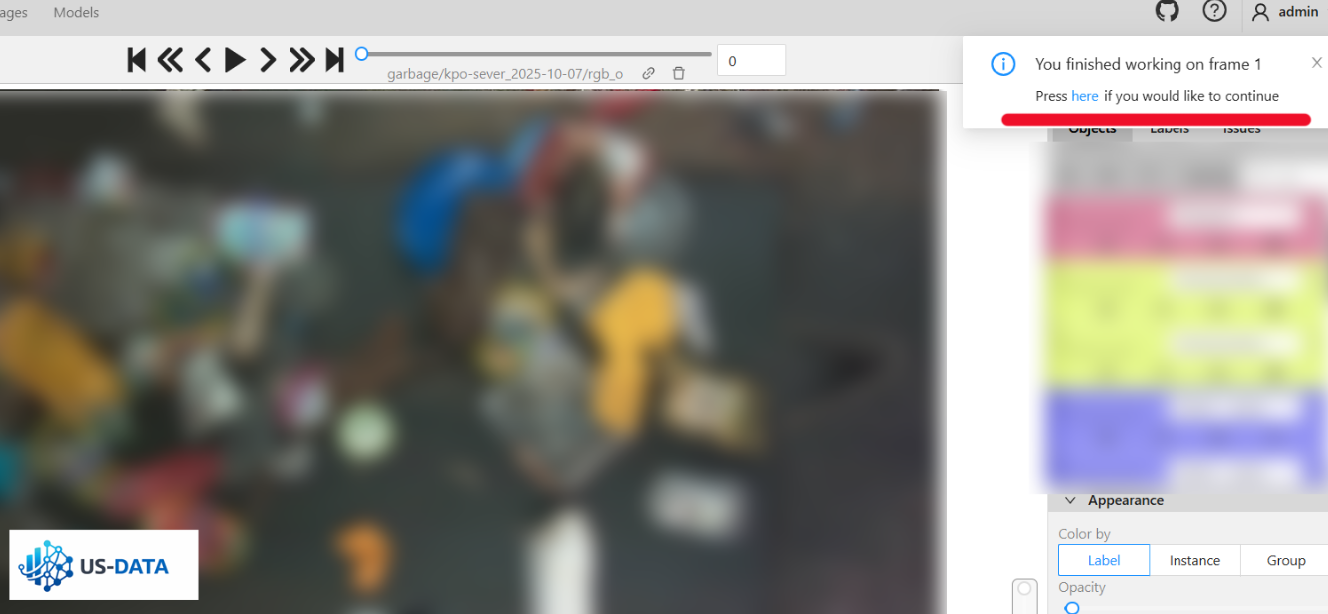
YOLOv5 automatic pre-annotation results opened for annotator review and correction.
Conclusion
Connecting a model to CVAT transfers a substantial amount of repetitive work from the annotator to the algorithm. Instead of drawing every object manually, the specialist receives a preliminary annotation and focuses on checking classes, correcting boundaries, and adding missed objects.
In this guide, we:
- checked the installed CVAT version;
- connected the Nuclio infrastructure;
- installed a compatible nuctl version;
- selected the built-in YOLOv5 model;
- deployed it as a serverless function;
- ran automatic annotation;
- checked the result in the CVAT interface.
The main advantage of this approach is that the model becomes part of the normal annotation workflow. Annotators do not need to run separate scripts, export images, or manually import predictions. The predictions are created directly inside the CVAT task and can be edited like ordinary annotations.
Pre-annotation should not be treated as a fully automatic replacement for manual work. Result quality depends on the dataset composition, model classes, confidence threshold, and the difference between the model's training data and the real project images. Before processing a large dataset, test the model on a small sample and verify that correcting its predictions is actually faster than annotating from scratch.
Standard YOLOv5 is suitable for testing the integration itself and for working with common objects from the COCO dataset. Production projects usually require a custom model trained on target classes such as industrial equipment, medical images, products, documents, road infrastructure, or other specialized objects.
After a successful test, the built-in model can be replaced with a custom one. This requires changing the class list in function.yaml, connecting the model weights, and adapting the handler so that it returns results in the CVAT format. The overall workflow remains the same:
Image in CVAT
↓
Nuclio serverless function
↓
Model inference
↓
Preliminary annotations
↓
Annotator review
↓
Final dataset
CVAT and Nuclio therefore make it possible to build a controlled human-in-the-loop annotation process: the model speeds up data processing, while the annotator ensures accuracy and compliance with project requirements.
About US-DATA
US-DATA helps companies prepare data for training machine learning, computer vision, and artificial intelligence models. The team annotates images, video, text, and audio, develops annotation guidelines, organizes quality control, and prepares datasets in the formats required for model training.
Learn more about our services:
- Image Annotation for Neural Networks
- Object Detection and Bounding Box Annotation
- Image Segmentation
- Polygon Image Annotation
- Video Annotation
If you need to prepare a dataset, organize model-assisted pre-annotation, or scale an annotation team, US-DATA specialists can help select the right tools and build a workflow aligned with your machine learning project requirements.